Java教程 第44页 Java脚本教程 – Java脚本输出 Nashorn提供了三种函数来输出文本到标准输出: print() 函数 printf() 函数 echo() 函数 echo()函数和print()函数相同,它仅在脚本模式下工作。 print()函数 print()函数是一个varargs函数。我们可以传递任意数量的参数。 print()函数将其参数转换为字符串,并打印它们,并用空格分隔它们。 print()函数在每个输出打印一个新行。 以下两个对print()函数的调用返回相同的值。 print("Hello", "World!"); // Prints Hello World! print("Hello World!"); // Prints Hello World! 完整的源代码 import javax.script.ScriptEngine; import javax.script.ScriptEngineManager; public class Main { public static void main(String[] args) throws Exception{ ScriptEngineManager manager = new ScriptEngineManager(); ScriptEngine engine = manager.getEngineByName("JavaScript"); String script = "print("Hello", "World!");"; engine.eval(script); script = "print("Hello World!");"; engine.eval(script); } } 上面的代码生成以下结果。 printf()函数 printf()函数使用printf-style来格式化打印。 它与使用Java方法 System.out.printf()相同: import javax.script.ScriptEngine; import javax.script.ScriptEngineManager; public class Main { public static void main(String[] args) throws Exception{ ScriptEngineManager manager = new ScriptEngineManager(); ScriptEngine engine = manager.getEngineByName("JavaScript"); String script = "printf("%d + %d = %d", 1, 2, 1 + 2);"; engine.eval(script); } } 上面的代码生成以下结果。 输出脚本执行结果 以下代码显示如何将脚本执行的输出写入名为jsoutput.txt的文件。 import java.io.File; import java.io.FileWriter; import javax.script.ScriptContext;...
2024-04-01
Java Lambda行为参数化 我们可以将lambda表达式作为参数传递给方法。 例子 以下代码创建了一个名为 Calculator 的函数接口。 在 Calculator 中有一个称为 calculate 的方法,它接受两个 int 参数并返回一个 int 值。 在 Main 类中有一个引擎方法,它接受函数接口Calculator作为参数。它从计算器调用计算方法并输出结果。 在主方法中,我们用不同的lambda表达式调用引擎方法四次。 public class Main { public static void main(String[] argv) { engine((x,y)-> x + y); engine((x,y)-> x * y); engine((x,y)-> x / y); engine((x,y)-> x % y); } private static void engine(Calculator calculator){ int x = 2, y = 4; int result = calculator.calculate(x,y); System.out.println(result); } } @FunctionalInterface interface Calculator{ int calculate(int x, int y); } 上面的代码生成以下结果。 注意 engine 方法的结果取决于传递给它的lambda表达式。 引擎方法的行为被参数化。 通过其参数更改方法的行为称为行为参数化。 在行为参数化中,我们将在lambda表达式中封装的逻辑传递给数据的方法。 行为参数化模糊性 编译器并不总是可以推断lambda表达式的类型。 一种情况是将lambda表达式传递给重载的方法。 在以下代码中有两个函数接口。 一个是 int 值计算,另一个用于 long 值。 在Main类中有称为 engine 的重载方法。 一个是期望 IntCalculator ,另一个是 LongCalculator 。 在main方法中,我们必须指定lambda表达式的参数,以指示我们要使用的重载函数的编译器。 public class Main { public static void main(String[] argv) { engine((int x,int y)-> x + y); engine((long x, long y)->...
2024-04-01
Java Lambda类型推断 lambda表达式表示函数接口的实例。 根据上下文,一个lambda表达式可以映射到不同的函数接口类型。 编译器推断lambda表达式的类型。 例子 在下面的代码中有两个函数接口, Processor 和SecondProcessor。 Processor 有一个名为 getStringLength 的方法,它接受一个字符串作为参数,并返回 int 。 SecondProcessor 有一个名为 noName 的方法,它接受一个字符串作为参数,并返回一个 int 。 从代码中,我们可以看到,我们可以为它们分配两个相同的lambda表达式。 public class Main { public static void main(String[] argv) { Processor stringProcessor = (String str) -> str.length(); SecondProcessor secondProcessor = (String str) -> str.length(); //stringProcessor = secondProcessor; //compile error String name = "Java Lambda"; int length = stringProcessor.getStringLength(name); System.out.println(length); } } @FunctionalInterface interface Processor { int getStringLength(String str); } @FunctionalInterface interface SecondProcessor { int noName(String str); } 上面的代码生成以下结果。 注意 Processor 或 SecondProcessor 称为目标类型。 推断lambda表达式类型的过程称为目标类型。 编译器使用以下规则来确定lambda表达式是否可分配给其目标类型: 它必须是一个函数接口。 lambda表达式的参数必须与函数接口中的抽象方法匹配。 lambda表达式的返回类型与函数接口中抽象方法的返回类型兼容。 从lambda表达式抛出的检查异常必须与函数接口中抽象方法的已声明的throws子句兼容。
2024-04-01
Java Lambda语法 使用lambda表达式的一般语法是 (Parameters) -> { Body } -> 分隔参数和lambda表达式主体。 参数括在括号中,与方法相同,而lambda表达式主体是用大括号括起来的代码块。 注意 lambda表达式主体可以有局部变量,语句。我们可以在lambda表达式主体中使用break,continue和return。我们甚至可以从lambda表达式主体中抛出异常。 lambda表达式没有名称,因为它表示匿名内部类。 lambda表达式的返回类型由编译器推断。 lambda表达式不能像方法一样有throws子句。 lambda表达式不能是泛型,而泛型在函数接口中定义。 显式和隐式lambda表达式 未声明其参数类型的lambda表达式称为隐式lambda表达式。 显式lambda表达式是一个lambda表达式,它声明其参数的类型。 编译器将推断用于隐式lambda表达式的参数类型 例子 以下代码使用单一方法创建接口,并将其用作lambda表达式类型。当创建lambda表达式时,我们声明参数 s1 的类型为Integer类型。 public class Main { public static void main(String[] args) { MyIntegerCalculator myIntegerCalculator = (Integer s1) -> s1 * 2; System.out.println("1- Result x2 : " + myIntegerCalculator.calcIt(5)); } } interface MyIntegerCalculator { public Integer calcIt(Integer s1); } 上面的代码生成以下结果。 例2 这里是没有使用类型的演示。当忽略类型时,编译器必须计算出来。 public class Main { public static void main(String[] args) { MyIntegerCalculator myIntegerCalculator = (s1) -> s1 * 2; System.out.println("1- Result x2 : " + myIntegerCalculator.calcIt(5)); } } interface MyIntegerCalculator { public Integer calcIt(Integer s1); } 上面的代码生成以下结果。 省略参数类型 我们可以选择省略lambda表达式中的参数类型。 在lambda表达式 (int x, int y) -> { return x + y; }声明的参数类型。 我们可以安全地重写lambda表达式,省略参数类型 (x, y) -> { return x...
2024-04-01
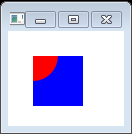
JavaFX教程 – JavaFX效果 混合效果 混合是将两个输入组合在一起的效果使用预定义的混合模式之一。 import javafx.application.Application; import javafx.scene.Group; import javafx.scene.Scene; import javafx.scene.effect.BlendMode; import javafx.scene.layout.HBox; import javafx.scene.paint.Color; import javafx.scene.shape.Circle; import javafx.scene.shape.Rectangle; import javafx.stage.Stage; public class Main extends Application { public static void main(String[] args) throws Exception { launch(args); } @Override public void start(final Stage stage) throws Exception { Rectangle r = new Rectangle(); r.setX(590); r.setY(50); r.setWidth(50); r.setHeight(50); r.setFill(Color.BLUE); Circle c = new Circle(); c.setFill(Color.RED); c.setCenterX(590); c.setCenterY(50); c.setRadius(25); c.setBlendMode(BlendMode.SRC_ATOP); Group g = new Group(); g.setBlendMode(BlendMode.SRC_OVER); g.getChildren().add(r); g.getChildren().add(c); HBox box = new HBox(); box.getChildren().add(g); Scene scene = new Scene(box, 400, 450); stage.setScene(scene); stage.show(); } } 以下代码使用COLOR_BURN混合模式。 Text text1 = new Text(25, 25, "www.w3cschool.cn"); text1.setFill(Color.CHOCOLATE); text1.setFont(Font.font(java.awt.Font.MONOSPACED, 35)); text1.setBlendMode(BlendMode.COLOR_BURN); 上面的代码生成以下结果。 BlendMode.MULTIPLY import javafx.application.Application; import javafx.scene.Group; import javafx.scene.Scene; import javafx.scene.effect.BlendMode; import javafx.scene.paint.Color; import javafx.scene.shape.Circle; import...
2024-04-01
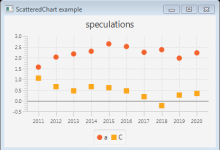
JavaFX教程 – JavaFX散点图 散点图是一个双轴图表,将其数据作为一组点显示。每个点由X和Y值定义。 import javafx.application.Application; import javafx.collections.FXCollections; import javafx.collections.ObservableList; import javafx.scene.Scene; import javafx.scene.chart.CategoryAxis; import javafx.scene.chart.NumberAxis; import javafx.scene.chart.ScatterChart; import javafx.scene.chart.XYChart; import javafx.scene.chart.XYChart.Series; import javafx.scene.layout.StackPane; import javafx.stage.Stage; public class Main extends Application { public static void main(String[] args) { launch(args); } @Override public void start(Stage primaryStage) { CategoryAxis xAxis = new CategoryAxis(); NumberAxis yAxis = new NumberAxis(); ScatterChart scatterChart = new ScatterChart(xAxis, yAxis); scatterChart.setData(getChartData()); scatterChart.setTitle("speculations"); primaryStage.setTitle("ScatteredChart example"); StackPane root = new StackPane(); root.getChildren().add(scatterChart); primaryStage.setScene(new Scene(root, 400, 250)); primaryStage.show(); } private ObservableList<XYChart.Series<String, Double>> getChartData() { double aValue = 1.56; double cValue = 1.06; ObservableList<XYChart.Series<String, Double>> answer = FXCollections.observableArrayList(); Series<String, Double> aSeries = new Series<String, Double>(); Series<String, Double> cSeries = new Series<String, Double>(); aSeries.setName("a"); cSeries.setName("C"); for (int i = 2011; i < 2021;...
2024-04-01
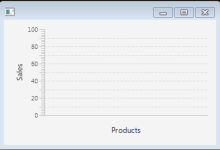
JavaFX教程 – JavaFX条形图 条形图是具有可以是垂直或水平的矩形条的双轴图表。 import javafx.application.Application; import javafx.scene.Group; import javafx.scene.Scene; import javafx.scene.chart.BarChart; import javafx.scene.chart.CategoryAxis; import javafx.scene.chart.NumberAxis; import javafx.scene.layout.VBox; import javafx.stage.Stage; public class Main extends Application { @Override public void start(final Stage stage) { stage.setTitle(""); stage.setWidth(500); stage.setHeight(500); Scene scene = new Scene(new Group()); VBox root = new VBox(); NumberAxis lineYAxis = new NumberAxis(0,100,10); CategoryAxis lineXAxis = new CategoryAxis(); BarChart barChart = new BarChart(lineXAxis,lineYAxis); lineYAxis.setLabel("Sales"); lineXAxis.setLabel("Products"); root.getChildren().addAll(barChart); scene.setRoot(root); stage.setScene(scene); stage.show(); } public static void main(String[] args) { launch(args); } } 上面的代码生成以下结果。 水平条形图 import javafx.animation.Animation; import javafx.animation.KeyFrame; import javafx.animation.Timeline; import javafx.application.Application; import javafx.event.ActionEvent; import javafx.event.EventHandler; import javafx.scene.Scene; import javafx.scene.chart.BarChart; import javafx.scene.chart.CategoryAxis; import javafx.scene.chart.NumberAxis; import javafx.scene.chart.XYChart; import javafx.stage.Stage; import javafx.util.Duration; public class Main extends Application { final static String itemA = "A"; final static...
2024-04-01
JavaFX教程 – JavaFX气泡图 气泡图是一个双轴图表,为一系列数据点绘制气泡。 创建气泡图 要创建气泡图,我们创建BubbleChart类,定义水平和垂直轴,并使用添加一个或多个数据系列XYChart.Data类。 /* * Copyright (c) 2011, 2012 Oracle and/or its affiliates. * All rights reserved. Use is subject to license terms. * * This file is available and licensed under the following license: * * Redistribution and use in source and binary forms, with or without * modification, are permitted provided that the following conditions * are met: * * - Redistributions of source code must retain the above copyright * notice, this list of conditions and the following disclaimer. * - Redistributions in binary form must reproduce the above copyright * notice, this list of conditions and the following disclaimer in * the documentation and/or other materials provided with the distribution. * - Neither...
2024-04-01
JavaFX教程 – JavaFX树表视图 JavaFX TreeTableView在表列中渲染数据的层次结构。 TreeTableView组件组合了TreeView和TableView控件。 import javafx.application.Application; import javafx.beans.property.ReadOnlyStringWrapper; import javafx.scene.Group; import javafx.scene.Scene; import javafx.scene.control.TreeTableColumn; import javafx.scene.control.TreeTableColumn.CellDataFeatures; import javafx.scene.control.TreeItem; import javafx.scene.control.TreeTableView; import javafx.stage.Stage; public class Main extends Application { public static void main(String[] args) { Application.launch(args); } @Override public void start(Stage stage) { final Scene scene = new Scene(new Group(), 200, 400); Group sceneRoot = (Group) scene.getRoot(); TreeItem<String> childNode1 = new TreeItem<>("Node 1"); TreeItem<String> childNode2 = new TreeItem<>("Node 2"); TreeItem<String> childNode3 = new TreeItem<>("Node 3"); TreeItem<String> root = new TreeItem<>("Root"); root.setExpanded(true); root.getChildren().setAll(childNode1, childNode2, childNode3); TreeTableColumn<String, String> column = new TreeTableColumn<>("Column"); column.setPrefWidth(150); column.setCellValueFactory((CellDataFeatures<String, String> p) -> new ReadOnlyStringWrapper( p.getValue().getValue())); TreeTableView<String> treeTableView = new TreeTableView<>(root); treeTableView.getColumns().add(column); sceneRoot.getChildren().add(treeTableView); stage.setScene(scene); stage.show(); } } 上面的代码生成以下结果。 添加几个列 /* * Copyright (c) 2008, 2014, Oracle and/or...
2024-04-01
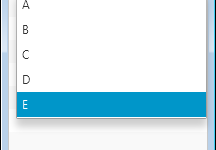
JavaFX教程 – JavaFX列表视图 ListView类允许我们显示一个可滚动的项目列表。 创建列表视图 以下代码创建了一个ListView并在之后填充数据。 ListView<String> list = new ListView<>(); ObservableList<String> items =FXCollections.observableArrayList ( "A", "B", "C", "D"); list.setItems(items); 要更改列表视图控件的大小和高度,使用setPrefHeight和setPrefWidth方法。 list.setPrefWidth(100); list.setPrefHeight(70); 更改ListView对象的方向 list.setOrientation(Orientation.HORIZONTAL) SelectionModel和FocusModel跟踪ListView对象的选择和焦点。 getSelectionModel().getSelectedIndex() – 返回所选的索引 getSelectionModel().getSelectedItem() – 返回所选项目 getFocusModel().getFocusedIndex() – 返回焦点项的索引 getFocusModel().getFocusedItem() – 返回焦点项 默认的selectionMode属性为SelectionMode.SINGLE。要在默认ListView实例中启用多选,请使用以下代码: listView.getSelectionModel().setSelectionMode(SelectionMode.MULTIPLE); ComboBox单元格 我们可以通过使用CheckBoxListCell,ChoiceBoxListCell,ComboBoxListCell和TextFieldListCell添加各种类型的数据。 它就像在Swing中使用CellRenderer。 以下代码使用ComboBoxListCell类在列表单元格中使用组合框。 import javafx.application.Application; import javafx.collections.FXCollections; import javafx.collections.ObservableList; import javafx.scene.Scene; import javafx.scene.control.ListView; import javafx.scene.control.cell.ComboBoxListCell; import javafx.scene.layout.StackPane; import javafx.stage.Stage; public class Main extends Application { public static void main(String[] args) { launch(args); } @Override public void start(Stage primaryStage) { ObservableList<String> names = FXCollections .observableArrayList(); ObservableList<String> data = FXCollections.observableArrayList(); ListView<String> listView = new ListView<String>(data); listView.setPrefSize(200, 250); listView.setEditable(true); names.addAll("A", "B", "C", "D", "E"); data.add("Double Click to Select Value"); listView.setItems(data); listView.setCellFactory(ComboBoxListCell.forListView(names)); StackPane root = new StackPane(); root.getChildren().add(listView); primaryStage.setScene(new Scene(root, 200, 250)); primaryStage.show();...
2024-04-01


 国外主机测评 - 国外VPS,国外服务器,国外云服务器,测评及优惠码


