Java教程 第45页 JavaFX教程 – JavaFX分页 分页控件用于浏览多个页面。 我们典型地使用对网页的分页控制,例如博客。 在博客页面的底部,我们可以看到一个矩形区域,作为一个数字列表来指示页面索引,以及一个下一个/上一个按钮来链接到下一个/上一个页面。 创建分页控件 分页控件由页面内容和页面导航区域组成。 创建具有不确定页计数和当前页索引等于零的分页控件 Pagination pagination1 = new Pagination(); 要创建一个5页的分页控件,当前页索引等于零 Pagination pagination2 = new Pagination(5); 要创建一个5页的分页控件,当前所选索引等于2 Pagination pagination3 = new Pagination(5, 2); /* * Copyright (c) 2008, 2014, Oracle and/or its affiliates. * All rights reserved. Use is subject to license terms. * * This file is available and licensed under the following license: * * Redistribution and use in source and binary forms, with or without * modification, are permitted provided that the following conditions * are met: * * - Redistributions of source code must retain the above copyright * notice, this list of conditions and the following disclaimer. * - Redistributions in binary form must reproduce the above copyright * notice, this...
2024-04-01
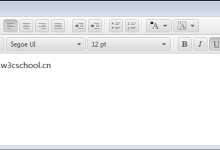
JavaFX教程 – JavaFX HTMLEditor HTMLEditor控件是一个富文本编辑器,具有以下功能。 粗体 斜体 下划线 删除线 字体系列 字体大小 前景色 背景颜色 缩进 项目符号列表 编号列表 对齐 水平线 复制文本片段 粘贴文本片段 HTMLEditor类返回HTML字符串中的编辑内容。 创建HTML编辑器 import javafx.application.Application; import javafx.scene.Scene; import javafx.scene.web.HTMLEditor; import javafx.stage.Stage; public class Main extends Application { @Override public void start(Stage stage) { HTMLEditor htmlEditor = new HTMLEditor(); htmlEditor.setPrefHeight(245); Scene scene = new Scene(htmlEditor); stage.setScene(scene); stage.show(); } public static void main(String[] args) { launch(args); } } 上面的代码生成以下结果。 HTML内容 要将内容设置为HTMLEditor类,请使用setHtmlText方法。 htmlEditor.setHtmlText(INITIAL_TEXT); import javafx.application.Application; import javafx.scene.Scene; import javafx.scene.web.HTMLEditor; import javafx.stage.Stage; public class Main extends Application { @Override public void start(Stage stage) { HTMLEditor htmlEditor = new HTMLEditor(); htmlEditor.setPrefHeight(245); String INITIAL_TEXT = "Lorem ipsum dolor sit " + "amet, consectetur adipiscing elit. Nam tortor felis, pulvinar " + "aliquam sagittis gravida eu dolor. Etiam...
2024-04-01
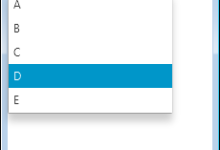
JavaFX教程 – JavaFX组合框 组合框允许用户选择几个选项之一。用户可以滚动到下拉列表。组合框可以是可编辑和不可编辑的。 创建组合框 以下代码将选项列表包装到ObservableList中,然后使用observable列表实例化ComboBox类。 ObservableList<String> options = FXCollections.observableArrayList( "1", "2", "3" ); ComboBox comboBox = new ComboBox(options); 我们还可以使用空构造函数创建一个组合框,并调用其setItems方法设置数据。 ComboBox comboBox = new ComboBox(options); comboBox.setItems(options); 向具有新值的项目的组合框中添加更多项目。 comboBox.getItems().addAll( "4", "5", "6" ); setValue 方法设置在组合框中选择的项目。在调用setValue方法时,即使值不在组合框项目列表中,selectionModel属性的选定项也会更改为此值。 getValue方法返回所选的值。 要限制下拉列表中可见行的数量,请使用以下代码。 comboBox.setVisibleRowCount(3) 可编辑的组合框 setEditable(true)方法使组合框可编辑。使用setPromptText方法,当不执行选择时,我们可以指定显示在组合框编辑区域中的文本。 ComboBox myComboBox = new ComboBox(); myComboBox.getItems().addAll( "s@example.com", "i@example.com", "e@example.com", "m@example.com" ); myComboBox.setPromptText("Email address"); myComboBox.setEditable(true); myComboBox.setOnAction((Event ev) -> { address = myComboBox.getSelectionModel().getSelectedItem().toString(); }); myComboBox.setValue("s@example.com"); 以下代码创建一个简单的可编辑组合框 import javafx.application.Application; import javafx.scene.Group; import javafx.scene.Scene; import javafx.scene.control.ComboBox; import javafx.stage.Stage; public class Main extends Application { public static void main(String[] args) { launch(args); } @Override public void start(Stage stage) { Scene scene = new Scene(new Group(), 450, 250); ComboBox<String> myComboBox = new ComboBox<String>(); myComboBox.getItems().addAll("A","B","C","D","E"); myComboBox.setEditable(true); Group root = (Group) scene.getRoot(); root.getChildren().add(myComboBox); stage.setScene(scene); stage.show(); } } 上面的代码生成以下结果。 组合框单元格...
2024-04-01
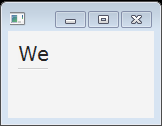
JavaFX教程 – JavaFX分隔符 Separator类表示水平或垂直分隔线。它分割元素,不产生任何动作。 我们可以设计风格,应用视觉效果,并为分隔符设置动画。 默认情况下,分隔符是水平的。我们可以使用setOrientation方法改变它的方向。 Separator类扩展了Node类。 创建分隔符 创建水平分隔符 Separator separator1 = new Separator(); 创建垂直分隔符 Separator separator2 = new Separator(); separator2.setOrientation(Orientation.VERTICAL); setMaxWidth方法定义了一个特定的宽度。 setValignment方法指定垂直位置。 例子 带分隔符的标签 import javafx.application.Application; import javafx.geometry.Insets; import javafx.geometry.VPos; import javafx.scene.Group; import javafx.scene.Scene; import javafx.scene.control.Label; import javafx.scene.control.Separator; import javafx.scene.layout.GridPane; import javafx.scene.text.Font; import javafx.stage.Stage; public class Main extends Application { Label caption = new Label("We"); @Override public void start(Stage stage) { Group root = new Group(); Scene scene = new Scene(root, 500, 200); stage.setScene(scene); GridPane grid = new GridPane(); grid.setPadding(new Insets(10, 10, 10, 10)); grid.setVgap(2); grid.setHgap(5); scene.setRoot(grid); caption.setFont(Font.font("Verdana", 20)); GridPane.setConstraints(caption, 0, 0); GridPane.setColumnSpan(caption, 8); grid.getChildren().add(caption); final Separator sepHor = new Separator(); sepHor.setValignment(VPos.CENTER); GridPane.setConstraints(sepHor, 0, 1); GridPane.setColumnSpan(sepHor, 7); grid.getChildren().add(sepHor); stage.show(); } public static void main(String[] args) { launch(args); } }...
2024-04-01
JavaFX教程 – JavaFX工具提示 当鼠标光标悬停在控件上时,将出现工具提示。 工具提示用于显示有关UI控件的其他信息。 我们可以通过调用setTooltip方法来安装工具提示。 工具提示有两种不同的状态:激活和显示。在激活状态和显示状态之间存在一些延迟。 创建工具提示 以下代码将工具提示安装到密码字段。它调用默认构造函数的Tooltip类。 PasswordField pf = new PasswordField(); Tooltip tooltip = new Tooltip(); tooltip.setText("info"); pf.setTooltip(tooltip); javafx.scene.control 包中的每个UI控件都有setTooltip方法。 我们还可以通过使用Tooltip构造函数传递一个文本标题来创建一个Tooltip对象。 Tooltip类扩展 Labeled 类也可以有一个文本标题作为图形图标。 以下代码会在工具提示中安装一个图标。 Image image = new Image(getClass().getResourceAsStream("warn.png")); tooltip.setGraphic(new ImageView(image));
2024-04-01
JavaFX教程 – JavaFX 文件选择器 FileChooser允许用户导航文件系统并选择一个文件或文件夹。 FileChooser类位于javafx.stage包中。 打开文件 文件选择器可用作打开文件对话框,用于选择单个文件或多个文件,或作为文件保存对话框。 以下代码创建一个FileChooser对象并设置其标题,然后显示到用户。 FileChooser fileChooser = new FileChooser(); fileChooser.setTitle("Open Resource File"); fileChooser.showOpenDialog(stage); 我们可以通过设置initialDirectory和title属性来配置文件选择器对话框窗口。 扩展过滤器 我们可以设置扩展过滤器来确定在文件选择器中打开哪些文件。 fileChooser.setTitle("View Pictures"); fileChooser.setInitialDirectory(new File(System.getProperty("user.home")) ); fileChooser.getExtensionFilters().addAll( new FileChooser.ExtensionFilter("All Images", "*.*"), new FileChooser.ExtensionFilter("JPG", "*.jpg"), new FileChooser.ExtensionFilter("GIF", "*.gif"), new FileChooser.ExtensionFilter("BMP", "*.bmp"), new FileChooser.ExtensionFilter("PNG", "*.png") ); 保存文件 FileChooser API允许用户指定文件名及其文件夹用于由应用程序保存的文件。 showSaveDialog方法打开保存对话框窗口。 FileChooser fileChooser1 = new FileChooser(); fileChooser1.setTitle("Save Image"); System.out.println(pic.getId()); File file = fileChooser1.showSaveDialog(stage); System.out.println(file); 例子 import java.io.File; import javafx.application.Application; import javafx.event.ActionEvent; import javafx.event.EventHandler; import javafx.scene.Group; import javafx.scene.Scene; import javafx.scene.control.Button; import javafx.scene.control.ScrollPane; import javafx.scene.control.TextArea; import javafx.scene.control.TextAreaBuilder; import javafx.scene.layout.VBox; import javafx.scene.layout.VBoxBuilder; import javafx.stage.FileChooser; import javafx.stage.Stage; public class Main extends Application { public static void main(String[] args) { launch(args); } @Override public void start(final Stage primaryStage) { Group root = new Group(); Button buttonLoad = new...
2024-04-01
JavaFX教程 – JavaFX日期选择器 JavaFX DatePicker允许从给定日历中选择一天。 DatePicker控件包含一个带有日期字段和日期选择器的组合框。 JavaFX DatePicker控件使用JDK 8日期时间API。 import javafx.application.Application; import javafx.scene.Scene; import javafx.scene.control.DatePicker; import javafx.scene.layout.VBox; import javafx.stage.Stage; public class Main extends Application { public static void main(String[] args) { launch(args); } @Override public void start(Stage stage) { VBox vbox = new VBox(20); Scene scene = new Scene(vbox, 400, 400); stage.setScene(scene); DatePicker checkInDatePicker = new DatePicker(); vbox.getChildren().add(checkInDatePicker); stage.show(); } } 上面的代码生成以下结果。 DatePicker创建 我们可以创建一个DatePicker并在类构造函数中设置一个特定的日期值。 dateP = new DatePicker(LocalDate.of(2014, 10, 8)); 我们还可以使用setValue方法设置日期值。 checkInDatePicker.setValue(LocalDate.of(2014, 10, 8)); checkInDatePicker.setValue(LocalDate.now()); 以下代码使用setValue向结束DatePicker添加更多时间。 import java.time.LocalDate; import javafx.application.Application; import javafx.scene.Scene; import javafx.scene.control.DatePicker; import javafx.scene.control.Label; import javafx.scene.layout.VBox; import javafx.stage.Stage; public class Main extends Application { public static void main(String[] args) { launch(args); } @Override public void start(Stage stage) { VBox vbox = new VBox(20); Scene scene = new Scene(vbox,...
2024-04-01
JavaFX教程 – JavaFX颜色选择器 颜色选择器控件使用户能够从可用范围中选择颜色,或通过指定RGB或HSB组合设置附加颜色。 JavaFX ColorPicker控件具有颜色选择器,调色板和自定义颜色对话框窗口。 ColorPicker创建 以下代码使用空构造函数和创建颜色选择器控件颜色选择器控件使用默认颜色,即WHITE。 ColorPicker colorPicker1 = new ColorPicker(); 我们还可以提供颜色常量作为当前选择的颜色。 ColorPicker colorPicker2 = new ColorPicker(Color.BLUE); 我们还可以提供网络颜色值作为当前选择的颜色 ColorPicker colorPicker3 = new ColorPicker(Color.web("#EEEEEE"选择器)); 例子 import javafx.application.Application; import javafx.event.ActionEvent; import javafx.scene.Scene; import javafx.scene.control.ColorPicker; import javafx.scene.layout.HBox; import javafx.scene.paint.Color; import javafx.scene.text.Text; import javafx.stage.Stage; public class Main extends Application { public static void main(String[] args) { launch(args); } @Override public void start(Stage stage) { Scene scene = new Scene(new HBox(20), 400, 100); HBox box = (HBox) scene.getRoot(); final ColorPicker colorPicker = new ColorPicker(); colorPicker.setValue(Color.RED); final Text text = new Text("Color picker:"); text.setFill(colorPicker.getValue()); colorPicker.setOnAction((ActionEvent t) -> { text.setFill(colorPicker.getValue()); }); box.getChildren().addAll(colorPicker, text); stage.setScene(scene); stage.show(); } } 自定义颜色 getCustomColors()方法返回创建的自定义颜色Color对象的ObservableList。 ObservableList<Color> customColors = colorPicker.getCustomColors(); colorPicker.setValue(customColors.get(index));
2024-04-01
Java流 – Java并行流 流可以是顺序的或并行的。 顺序流上的操作由一个线程串行处理。 使用多个线程并行处理并行流上的操作。 默认情况下,Streams API中的大多数方法都会生成顺序流。要从集合(如列表或集合)创建并行流,调用Collection接口的parallelStream()方法。 对流使用parallel()方法将顺序流转换为并行流。 对流使用sequential()方法将并行流转换为顺序流。 例子 以下代码显示如何对流进行串行处理: import java.time.LocalDate; import java.time.Month; import java.util.Arrays; import java.util.List; import java.util.stream.Collectors; public class Main { public static void main(String[] args) { String names = Employee.persons() .stream() .filter(Employee::isMale) .map(Employee::getName) .collect(Collectors.joining(", ")); System.out.println(names); names = Employee.persons() .parallelStream() .filter(Employee::isMale) .map(Employee::getName) .collect(Collectors.joining(", ")); System.out.println(names); } } class Employee { public static enum Gender { MALE, FEMALE } private long id; private String name; private Gender gender; private LocalDate dob; private double income; public Employee(long id, String name, Gender gender, LocalDate dob, double income) { this.id = id; this.name = name; this.gender = gender; this.dob = dob; this.income = income; } public String getName() { return name; } public boolean isMale() { return this.gender...
2024-04-01
Java流 – Java流匹配 Streams API支持对流元素执行不同类型的匹配操作。 Stream接口中的以下方法用于执行匹配操作: boolean allMatch(Predicate<? super T> predicate) boolean anyMatch(Predicate<? super T> predicate) boolean noneMatch(Predicate<? super T> predicate) 诸如IntStream,LongStream和DoubleStream的原始类型流也包含与谓词一起使用的相同方法和用于原语类型的可选方法。 所有匹配操作都是终端操作。它们也是短路操作。短路操作可以不必处理整个流以返回结果。 以下代码显示如何对流执行匹配操作。 import java.time.LocalDate; import java.time.Month; import java.util.Arrays; import java.util.List; public class Main { public static void main(String[] args) { List<Employee> persons = Employee.persons(); // Check if all persons are males boolean allMales = persons.stream().allMatch(Employee::isMale); System.out.println("All males: " + allMales); // Check if any person was born in 1971 boolean anyoneBornIn1971 = persons.stream().anyMatch(p -> p.getDob().getYear() == 1971); System.out.println("Anyone born in 1971: " + anyoneBornIn1971); } } class Employee { public static enum Gender { MALE, FEMALE } private long id; private String name; private Gender gender; private LocalDate dob; private double income; public Employee(long id, String name, Gender...
2024-04-01

 国外主机测评 - 国外VPS,国外服务器,国外云服务器,测评及优惠码


